Automating Bug Bounties using Kubernetes and Argo
I have experimented a lot trying to create fast and efficient workflows that would help me automate my recon process during bug hunting. At first using Python, RabbitMQ and Docker but I have now moved my whole process inside GKE using Kubernetes and Argo Events. I found out that using Argo I can easily pass data from one pod to another inside the workflow and also use RabbitMQ as a message queue.
Argo Workflows & Events
Argo Events can help you automate your workflows inside Kubernetes and also offer a variety of events to trigger them like webhooks, message queues, etc. Personally I have only used webhooks and message queues using RabbitMQ. Both are very simple to use, the first one can be triggered by classic curl request and the latter using python’s pika module or a quick golang program.
Setting up Argo in GCP
You can start by creating an account in GCP where you get a number of credits for the first 90 days of use, that should be enough for you to see if GCP and Argo are the right tools for your automation. You will also need to download gcloud and kubectl.
Start by creating a project and selecting it to setup Argo inside it.
gcloud projects create bug-bounty-argo
gcloud config set project bug-bounty-argo
You will then need to create a cluster which you can do with:
gcloud container clusters create bug-bounty-argo --cluster-version 1.18.16-gke.300 --disk-size 200 --num-nodes 1 --machine-type e2-small --no-enable-cloud-logging --no-enable-cloud-monitoring --zone europe-west2-a
With kubectl running locally you can run the commands below to access the cluster
gcloud container clusters get-credentials bug-bounty-argo --zone europe-west2-a
kubectl get nodes
Installing Argo and Argo Events
The fastest way to have a cluster with Argo installed is to run the below. However, I would first recommend you to go through the YAML files and understand what each one is doing.
kubectl create ns argo
kubectl apply -n argo -f https://raw.githubusercontent.com/argoproj/argo-workflows/release-2.12.4/manifests/install.yaml
Proceed with the Argo Events installation:
kubectl create namespace argo-events
kubectl apply -f https://raw.githubusercontent.com/argoproj/argo-events/v1.2.3/manifests/install.yaml
kubectl apply -n argo-events -f https://raw.githubusercontent.com/argoproj/argo-events/v1.2.3/examples/eventbus/native.yaml
Example Argo Webhook Workflow
To see if everything is installed correctly and with no errors you can now setup a webhook event that will listen for events on port 12000. You will need to first setup the Event Source and Sensor:
kubectl apply -n argo-events -f https://raw.githubusercontent.com/argoproj/argo-events/stable/examples/event-sources/webhook.yaml
kubectl apply -n argo-events -f https://raw.githubusercontent.com/argoproj/argo-events/stable/examples/sensors/webhook.yaml
Once the Event Source and Sensor are running you can create a port forward on 12000 to listen to your messages.
kubectl -n argo-events port-forward $(kubectl -n argo-events get pod -l eventsource-name=webhook -o name) 12000:12000
Finally, curl can be used to send a message:
curl -d '{"message":"this is my first webhook"}' -H "Content-Type: application/json" -X POST http://localhost:12000/example
You can now download the Argo CLI tool and use to submit workflows or view their process. For example:
argo list -n argo-events

NAME            STATUS    AGE   DURATION   PRIORITY
webhook-g2x8h   Running   0s    1s         0

argo get -n argo-events @latest

Name:                webhook-g2x8h
Namespace:           argo-events
Status:              Succeeded
Conditions:
 Completed           True
Progress:            1/1
Parameters:
  message:           {"context":{"id":"39663737663965312d383431622d346336622d613865662d323836346430366265386461","source":"webhook","specversion":"1.0","type":"webhook","datacontenttype":"application/json","subject":"example","time":"2021-04-12T16:50:48Z"},"data":"eyJoZWFkZXIiOnsiQWNjZXB0IjpbIiovKiJdLCJDb250ZW50LUxlbmd0aCI6WyIzOCJdLCJDb250ZW50LVR5cGUiOlsiYXBwbGljYXRpb24vanNvbiJdLCJVc2VyLUFnZW50IjpbImN1cmwvNy42OC4wIl19LCJib2R5Ijp7Im1lc3NhZ2UiOiJ0aGlzIGlzIG15IGZpcnN0IHdlYmhvb2sifX0="}

STEP              TEMPLATE  PODNAME        DURATION  MESSAGE
 ✔ webhook-g2x8h  whalesay  webhook-g2x8h  24s

argo logs -n argo-events @latest

webhook-g2x8h: / {"context":{"id":"39663737663965312d383 \
webhook-g2x8h: | 431622d346336622d613865662d323836346430 |
webhook-g2x8h: | 366265386461","source":"webhook","specv |
webhook-g2x8h: | ersion":"1.0","type":"webhook","datacon |
webhook-g2x8h: | tenttype":"application/json","subject": |
webhook-g2x8h: | "example","time":"2021-04-12T16:50:48Z" |
webhook-g2x8h: | },"data":"eyJoZWFkZXIiOnsiQWNjZXB0IjpbI |
webhook-g2x8h: | iovKiJdLCJDb250ZW50LUxlbmd0aCI6WyIzOCJd |
webhook-g2x8h: | LCJDb250ZW50LVR5cGUiOlsiYXBwbGljYXRpb24 |
webhook-g2x8h: | vanNvbiJdLCJVc2VyLUFnZW50IjpbImN1cmwvNy |
webhook-g2x8h: | 42OC4wIl19LCJib2R5Ijp7Im1lc3NhZ2UiOiJ0a |
webhook-g2x8h: \ GlzIGlzIG15IGZpcnN0IHdlYmhvb2sifX0="}   /
webhook-g2x8h:  -----------------------------------------
[...]
Setting up Google Storage for Argo
Argo supports Google Storage buckets that you can use to save your scan results. You will need to create a bucket first and then in order to set it up you need to create a secret to store the bucket’s access and secret keys. For example, the contents of the gcs-secret.yml are shown below:
apiVersion: v1
kind: Secret
metadata:
  name: my-gcs-cred
type: Opaque
data:
  accessKey: <base64-access>
  secretKey: <base64-secret>
You will then need to create/edit the workflow controller on both namespaces to store the results in the bucket. You can do this with the below and store it to workflow-controller-configmap.yml:
apiVersion: v1
kind: ConfigMap
metadata:
  name: workflow-controller-configmap
data:
  artifactRepository: |
    s3:
      bucket: bounty-argo-workflows
      endpoint: storage.googleapis.com
      insecure: true
      accessKeySecret:
        name: my-gcs-cred
        key: accessKey
      secretKeySecret:
        name: my-gcs-cred
        key: secretKey
      useSDKCreds: false
Finally, apply changes in both namespaces:
kubectl -n argo apply -f workflow-controller-configmap.yaml
kubectl -n argo-events apply -f workflow-controller-configmap.yaml
Running an Example Workflow
We can now write a workflow that will receive a domain to review and it will start by running httprobe. It will then store the results into a file but also in a JSON Array. The latter is required in order to split the results (if there are multiple ones) and pass them seperately into dirsearch. The next step will be to run httpx, nuclei and dirsearch in parallel.
You can find the example below and others in my Gitlab Repository.
apiVersion: argoproj.io/v1alpha1
kind: Sensor
metadata:
  name: amqp
spec:
  template:
    serviceAccountName: argo-events-sa
  dependencies:
    - name: test-dep
      eventSourceName: amqp
      eventName: example
  triggers:
    - template:
        name: amqp-workflow-trigger
        k8s:
          group: argoproj.io
          version: v1alpha1
          resource: workflows
          operation: create
          source:
            resource:
              apiVersion: argoproj.io/v1alpha1
              kind: Workflow
              metadata:
                generateName: endpoints-
              spec:
                entrypoint: combo
                serviceAccountName: argo-events-sa

                arguments:
                  parameters:
                  - name: message
                    value:

                volumes:
                - name: webhook-volume
                  persistentVolumeClaim:
                    claimName: webhook-claim

                templates:
                - name: combo
                  steps:
                  - - name: httprobe
                      template: httprobe
                  - - name: httpx
                      template: httpx
                      arguments:
                        artifacts:
                        - name: httprobe-results
                          from: "{{steps.httprobe.outputs.artifacts.httprobe}}"
                    - name: nuclei
                      template: nuclei
                      arguments:
                        artifacts:
                        - name: httprobe-results
                          from: "{{steps.httprobe.outputs.artifacts.httprobe}}"
                    - name: dirsearch
                      template: dirsearch
                      arguments:
                        parameters:
                        - name: target
                          value: "{{item}}"
                      withParam: "{{steps.httprobe.outputs.parameters.livedomains}}"

                - name: httprobe
                  container:
                    image: thealchemist11/tomnomnom-tools
                    command: [sh, -c]
                    args: ["echo {{workflow.parameters.message}} | httprobe -p 8080,https:8443,80,https:443 -c 150 -t 15000 > /tmp/httprobe.txt; cat /tmp/httprobe.txt | jq -R . | jq -s . > /tmp/httprobe.json"]
                  outputs:
                    parameters:
                      - name: livedomains
                        valueFrom:
                          path: /tmp/httprobe.json
                    artifacts:
                    - name: httprobe
                      path: /tmp/httprobe.txt

                - name: nuclei
                  inputs:
                    artifacts:
                    - name: httprobe-results
                      path: /tmp/httprobe
                  container:
                    image: thealchemist11/nuclei
                    command: [sh, -c]
                    args: ['/tools/nuclei -l /tmp/httprobe -t /tools/nuclei-templates/cves/ -t /tools/nuclei-templates/technologies -silent -retries 3 -timeout 10 -o /tmp/nuclei.txt']
                  outputs:
                    artifacts:
                    - name: nuclei
                      path: /tmp/nuclei.txt

                - name: httpx
                  inputs:
                    artifacts:
                    - name: httprobe-results
                      path: /tmp/httprobe
                  container:
                    image: projectdiscovery/httpx
                    command: [sh, -c]
                    args: ['httpx -l /tmp/httprobe -retries 4 -title -content-length -status-code -follow-redirects -o /tmp/httpx.txt']
                  outputs:
                    artifacts:
                    - name: httpx
                      path: /tmp/httpx.txt

                - name: dirsearch
                  inputs:
                    parameters:
                      - name: target
                  container:
                    image: jradik/dirsearch-docker
                    command: [sh, -c]
                    args: ['/root/dirsearch/dirsearch.py -u {{inputs.parameters.target}} -e .php,.js,.aspx -x 400,429,501,503,520 --plain-text-report=/tmp/dirsearch.txt']
                  outputs:
                    artifacts:
                    - name: dirsearch
                      path: /tmp/dirsearch.txt

          parameters:
            - src:
                dependencyName: test-dep
                dataKey: body.message
              dest: spec.arguments.parameters.0.value
As this Argo Event is using AMQP we will need to setup a RabbitMQ pod together with the Event Source to listen and send messages to the queue. You can use the below:
kubectl -n argo-events apply -f https://raw.githubusercontent.com/argoproj/argo-events/master/examples/event-sources/amqp.yaml
kubectl -n argo-events apply -f workflow.yaml
Then create the RabbitMQ pod:
apiVersion: v1
kind: Service
metadata:
  labels:
    component: rabbitmq
  name: rabbitmq-service
spec:
  ports:
    - port: 5672
  selector:
    app: taskQueue
    component: rabbitmq
---
apiVersion: v1
kind: ReplicationController
metadata:
  labels:
    component: rabbitmq
  name: rabbitmq-controller
spec:
  replicas: 1
  template:
    metadata:
      labels:
        app: taskQueue
        component: rabbitmq
    spec:
      containers:
        - image: rabbitmq
          name: rabbitmq
          ports:
            - containerPort: 5672
          resources:
            limits:
              cpu: 100m
Now apply the YAML file into the argo-events namespace:
kubectl -n argo-events apply -f rabbit.yaml
Then locate the RabbitMQ Pod name and port forward on 5672:
kubectl -n argo-events get pods
kubectl -n argo-events port-forward <rabbitmq-pod-name> 5672:5672
A quick python script to help you trigger the workflow and send the domain to scan into RabbitMQ would be:
import pika

f = open('./subdomains.txt', 'r')

for subdomain in f:
        sub = subdomain.rstrip()
        print sub

        connection = pika.BlockingConnection(pika.ConnectionParameters('localhost'))
        channel = connection.channel()
        channel.basic_publish(exchange='test', routing_key='hello', body='{"message": "' + sub + '"}')
Now running a quick scan on uber.com and checking the workflow we have (also notice how argo split the two domains identified by httprobe and scheduled two dirsearch scans):
argo -n argo-events get @latest

Name:                endpoints-btnkf
Namespace:           argo-events
ServiceAccount:      argo-events-sa
Status:              Succeeded
Conditions:
 Completed           True
Duration:            1 hour 6 minutes
Progress:            5/5
ResourcesDuration:   4h19m31s*(1 cpu),4h19m31s*(100Mi memory)
Parameters:
  message:           uber.com

STEP                                  TEMPLATE   PODNAME                     DURATION  MESSAGE
 ✔ endpoints-btnkf                    combo
 ├───✔ httprobe                       httprobe   endpoints-btnkf-3851781355  9s
 └─┬─✔ dirsearch(0:https://uber.com)  dirsearch  endpoints-btnkf-3047568844  1h
   ├─✔ dirsearch(1:http://uber.com)   dirsearch  endpoints-btnkf-1686601986  1h
   ├─✔ httpx                          httpx      endpoints-btnkf-2676845826  22s
   └─✔ nuclei                         nuclei     endpoints-btnkf-3145352274  1m
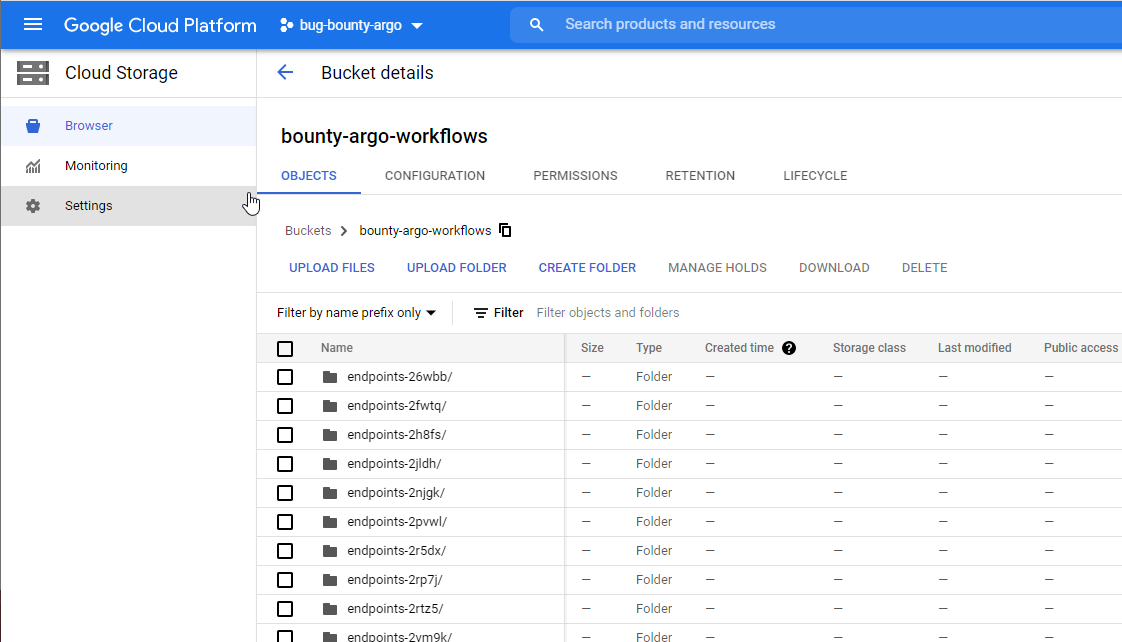
The scan results from all tools are stored in the bucket we created earlier:
All the above and the use of Argo showed us how easy you can run multiple tools and pass data between Pods, something that would potentially require a lot of lines of code to implement in bash or python.